How to export drawings from one Tekla model to another
Are you a BIM professional or Tekla detailing service provider looking forward to learn the process of exporting drawings from one model to another? This blog will be a good learning point for you on this matter.
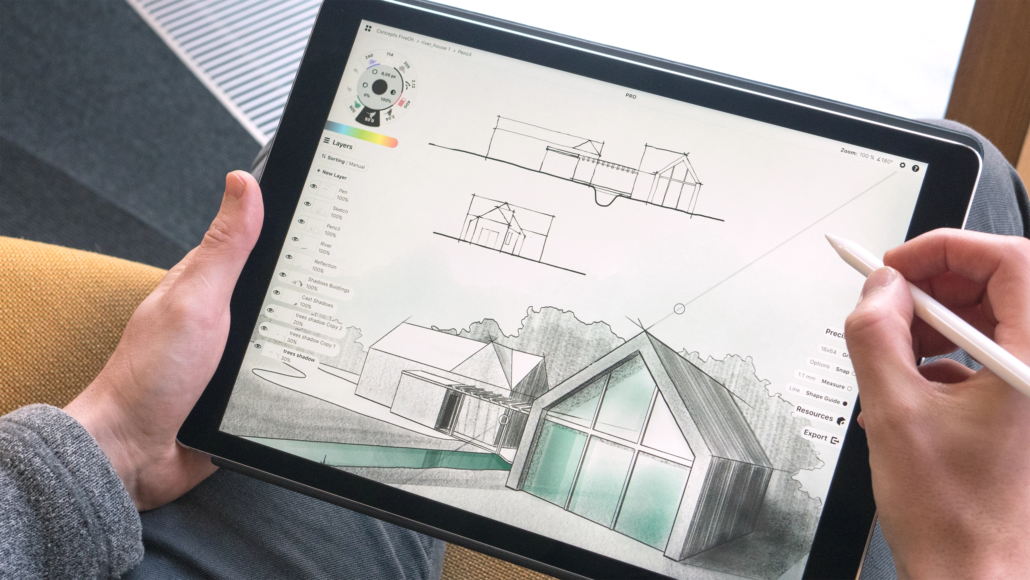
Exporting drawings and layouts from one Tekla model to another seems challenging, but it is a very straightforward process. By practising these two to three times, you can become an expert and save a lot of time. When dealing with the clients, most BIM and CAD professionals ask this query, “Can you convert sketch files to CAD? Or can you show us designs and layouts from previous projects of the same scope in Tekls? AS a professional and expert, you must have known the transferring of layouts and designs from one model to another in Tekla so that you can showcase the client’s project efficiently within no time.
So, let’s delve into the Tekla models’ features to explore how we can export drawings from one Tekla model to another.
Importance of Exporting Drawings from One Tekla Model to Another
Do you ever think that exporting drawings from one Tekla model to another is just a shortcut? No, it goes beyond this. It is a procedure that promotes cooperation and communication between stakeholders and members of the building team, saves time, and increases work efficiency. Exporting drawings and layouts from one model to another is a smart move when working on a bigger project or many projects of the same size and scope. Recreating the same drawings manually can enhance the chances of human error, while exporting drawings enhances the accuracy and efficiency and reduces the chances of human error. Exporting drawings is beneficial to drive insights, meet regulatory compliance, and implement the same agreements to save time. It is not only helpful for the BIM experts and Tekla modelers but also enhances the collaboration among stakeholders and enables people from different disciplines to have a smoother transition of the model.

Process to Export Drawings from One Tekla Model to Another?
There are two methods to export layouts between Tekla models
- Cloning method
- Exporting drawings
Let’s discuss them one by one:
1. Cloning Method
It is the advanced method that involves cloning the same models, layouts, and drawings that are similar between two projects. Let’s discuss its steps.
Open Source Model
First of all, open the required model where the drawings and layouts exist that you want to copy to export into another model.
Copy Required Drawings and Layouts
The next step is to open the “Mater Drawing Catalog” and then click on the drawings you want to export. Then click on the “Save as Template” to preserve your settings, drawings, and layouts.
Open Target Model
Now, open the target model where you want to export customized drawings and designs. Go to the “Master Drawing catalog” and click on the “Colne” button. The copied designs and drawings will be adjusted to the required model.
Final Adjustments
If required, make any changes and final adjustments. All the drawings and designs are cloned.
2. Exporting drawings
This method is also very easy, and you can export drawings easily. Let’s discuss this method step by step.
Open Source Model
First of all, open the source model. Go to the “Document Manager” and view all drawings in the different formats, and finalize which format you require.
Copy Drawings
Copy the required drawings and then click right, various options will be available. Click on the export option and choose the format (.zip, .xml, etc.). Save the exported file into a desired location.
Open Targeted Model
Open the targeted model where you want to export. Click on the “File” and then on the Import. Now import the designs and layouts that you have saved.
Which Method is More Convenient?
The cloning method is more convenient than the traditional import and export workflow. Cloning produces quicker, cleaner, hands-free outcomes for repeating structures or phased tasks, although exporting is still helpful for archiving or moving across distinct models. It recreates all dimensions, layouts, and designs in the targeted model with a single click. Further, it eliminates the need for file handling and renaming.
Common Mistakes to Avoid While Exporting Drawings
- Some users export the files without any upgrade because it leads to outdated drawings.
- Choosing the incorrect format is another mistake that causes issues later
- Exporting unnecessary files repeatedly, which causes a bulk in the targeted model
- Saving in an unknown location without giving any name to a folder creates ambiguity
- Creating copy folders in the targeted model without matching the assemblies with the reference folder.
Tips to Ensure Drawing Accuracy After Import
Here are the following tips for the accurate importing of designs and layouts from one model to another
- Cross-check the similarity in designs and layouts before exporting
- Make necessary changes in the designs after exporting
- Save the drawings in your preferred version before exporting
- Compare exported designs with the original versions to spot any required changes
- Review layouts and drawings to maintain accuracy and consistency.
- Try to protect from Tekla crashing on model writeout
Call Us To Get Help For Your Tekla Structure Models
Final Words
Exporting drawings from one model to another from the Tekla software is very efficient for time savings and automated processing. Cloning method, saving the file, and then importing is another method. You can choose anyone according to your convenience and learning perspective.
Frequently Asked Questions
Who uses Tekla software?
Tekla detailing service providers and BIM professionals use Tekla software.
What is the benefit of exporting Tekla designs and layouts from one model to another?
It saves time, enhances collaboration, and communication.